It is buggy as hell, and support is ridiculous. The little 501(c)(3) I volunteer with had to get a new calendar plugin in a hurry, and we went with this one, per my recommendation. As it turns out, it was a terrible choice.
Category: WordPress
WordPress migration notes, part 3
Joy. Not.
I get to do a migration from my existing website to a new instance of WordPress on a new (virtual) machine.
This is the website I maintain as a volunteer service for a fellowship I am a part of. I’m the web servant, and have been since 2017. I originally inherited the static HTML website from a gentleman who wrote it in Microsoft FrontPage 98. But a few months later, a member showed me an app that helps our members find meetings. That app was written by a member, and is easiest to implement as a WordPress plugin. “I guess I’m learning WordPress now” was my 2017 motto.
Indeed, I wrote a whole new website using WordPress and incorporated the meeting finder plugin. I’ve been maintaining the website ever since. Five months ago, I migrated it from Bitnami on Amazon Lightsail, to straight Debian on Linode. For five months, it ran fine, mostly. Twice in the five months, MariaDB crashed due to an out-of-memory error.
Today, it cannot get but a few hours before MariaDB crashes due to an out-of-memory error. Something changed, but I don’t know what.
So I have created a new Debian virtual machine on Linode, and am installing WordPress on it. What follows are a few notes about the process.
I spun up a shared hosting Linode on the Nanode 1 GB plan. I should mention that this website doesn’t get but a thousand or two hits per month, and we recently had to cut our office manager’s pay 20% because inflation is hurting everyone and donations are down. More than $7 per month would be wasteful, and us not being good stewards of our member’s money.
So, Debian is installed, and I ran updates, and it is time to start configuring the new server. I’m still using only the IP address to get to the new machine, and will have to configure Let’s Encrypt / Certbot later.
First things first:
Vim was preinstalled, which was nice. That left picking my default editor:
update-alternatives --config editor
Next, I want to customize my bash shell:
vim ~/.bashrc
I commented in the aliases for ll and l and the export command for ls to use --color=auto
Then I added at the end:
alias ..='cd ..'
PS1="\[\033[0;32m\]\u\[\033[0;37m\]@\[\033[0;35m\]\h \[\033[0;34m\]\W\[\033[0;31m\]\$\[\033[0m\] "
Next, I set the host name:
hostnamectl set-hostname www.example.org
I think I rebooted, and then got back in.
apt install apache2 -y
systemctl status apache2
apt-get install php8.2 php8.2-cli php8.2-common php8.2-xml php8.2-mysqli php8.2-zip php8.2-curl libapache2-mod-php -y
This is similar to what is being described at Rose Hosting, but with a few changes.
I’m leaving out php8.2-imap, php8.2-redis, php8.2-snmp, and php8.2-mbstring. I know that I don’t have a need to do IMAP to a mailbox, because this small 1 GB1 RAM machine won’t be hosting a mail server. With “only” 1 GB of RAM, I need run as little excess code as possible. Likewise, I’m leaving out Redis because it really expects a minimum of 8 GB of RAM. I’m not planning on exposing SNMP to the outside world, so that can go. And I don’t see that I’ll ever need multibyte strings, so php8.2-mbstring is out.
Next is the database:
apt install mariadb-server -y
mysql_secure_installation
mariadb
systemctl enable mariadb
When I logged in to MariaDB, I did the Step 5. Create a WordPress database and user from the Rose Hosting page.
However, I used the same user name and password as on the old website. This is because I want to use the same wp-config.php from the old server. This has complications later.
Because of the low RAM situation and Automattic’s getting wasteful with other people’s money, instead of wget https://wordpress.org/latest.zip I brought in wordpress-6.5.5.tar.gz
Although I did this, Automattic is arrogant enough to know better than me, and upgraded me to the latest version anyway. I had to downgrade, manually. I would later have to add a plugin to prevent WordPress from upgrading itself.
WordPress was extremely grumpy and would not let me get to the administration pages to run the update permalinks action.
And at some point, WordPress got all messed up. It was a similar problem as talked about here, but it didn’t have the Bitnami components to it; only the wp-config.php. Since I brought in that file from the old server, I didn’t have to edit it, but now two records inside the database don’t match the configuration.
I was also trying to bring in the Apache configuration files from the old server. I don’t recall if I fixed Apache first, or WordPress first.
Since I had brought in the Apache configuration files from the old server, there were directives in the configuration files which needed to be met. This meant running the following, because Apache wouldn’t load without them:
a2enmod rewrite
a2enmod ssl
I did bring the configuration files in, but now Apache is grumpy about the missing SSL configuration. I needed to copy in the files from the Let’s Encrypt install.
If I recall correctly, this got Apache running, but WordPress was pretty messed up because it thought the root of the website was under /wordpress/ instead of under the base directory of /
There were two things I needed to do. One was to edit .htaccess in the WordPress directory:
RewriteBase /
RewriteRule . /index.php [L]
Both of these previously referred to /wordpress/ instead of /
The other thing I needed to do was to log in to MariaDB and run:
UPDATE wp_options SET option_value = REPLACE(option_value, 'http://172.16.1.1/wordpress', 'http://172.16.1.1/') WHERE option_name = 'siteurl';

UPDATE wp_options SET option_value = REPLACE(option_value, 'http://172.16.1.1/wordpress', 'http://172.16.1.1/') WHERE option_name = 'home';
Where 172.16.1.1 is a placeholder for the actual IP address of the running server.
And finally, I have a base WordPress install with the default theme, and the same admin password and path as the old server.
Now to migrate the old content over. I need to remind myself that I “get” to do this. Serenity Now! Serenity Now! Serenity Now!!!
- It amuses me to put the word “small” next to the phrase “1 GB RAM”. The first computer I ever programmed (in 1979) was a mini-mainframe with 4 KB of RAM. ↩︎
WordPress error – somewhat passive-aggressive, methinks
The error was:
Deletion failed: There has been a critical error on this website.Learn more about troubleshooting WordPress.
I think that would have been helpful, if there was an anchor tag in there somewhere, but there was not. Simply the command “Learn more about troubleshooting WordPress, dumbshit.”
Well, that last comma and word are what I was reading into it….
Updating WordPress Was A Mistake, Redux
This week, I have been plagued by WordPress; the website I made for my volunteer service keeps crashing because MariaDB is having out-of-memory problems. This is frustrating because it ran fine for five months. But suddenly, the site cannot go three hours before going down. Sigh.
However, I had run the site with the latest version of WordPress. From this post, I had talked about previously needing to downgrade to keep my personal website (this page you are reading) from crashing. I said it was easy, but I didn’t outline the steps.
Well, with the volunteer service website crashing constantly, I’m trying this downgrade again.
Here are the steps:
- Make a backup of the server.
- Get a copy of wordpress-6.5.5.tar.gz and copy it to the server.
- extract it with tar -xzf wordpress-6.5.5.tar.gz
- change directory into the extracted folder
- delete the file wp-config-sample.php
- copy the production wp-config.php from /var/www/html (or wherever) to the newly extracted folder1
- (Still within the extracted folder of the downloaded WordPress 6.5.5): delete the wp-content folder.
- This is one of the good things about WordPress: everything that is not stored in the database is stored here. This includes the uploads folder (the media library content), the themes, the plugins. So for the source we’re going to downgrade from, we don’t need this folder.
- change directory to /var/www/html (or wherever)
- rm -r wp-includes
- rm -r wp-admin
- wp-includes is where most of the WordPress code lives. But there is also WordPress code in wp-admin
- Production is now broken
- cp -r /wherever_you_downloaded_and_extracted_to/wordpress/* /var/www/html/wherever/
- chown -R www-data:www-data /var/www/html/wherever/
- find /var/www/html/wherever/ -type d -exec chmod 755 {} \;
- find /var/www/html/wherever/ -type f -exec chmod 644 {} \;
- systemctl restart apache2
- Production is back up, but there’s still another step
- Log in to the WordPress website as admin. It will prompt you to update the database. Yes, do that.
And my downgrade, which is an improvement over having the bloated React JSX stuff, is complete.
Well, there’s one more step: email the office manager that when she logs in to WordPress to add a post or a meeting or event or whatever, do not click this link:

That’s always nice: leaving an easy way to shoot one’s self in the foot just sitting there, begging to be clicked. Sigh.
- I always liked that SuSE put the web server web sites under /srv instead of /var – there’s a lot of weird stuff in /var but for a web server, having the web site under /srv/www just makes sense. And yes, if you are setting up an FTP server, all that goes under /srv/ftp. What a concept! ↩︎
What The Eff WordPress?
I use my blog as a way to store notes and links for myself, so I can come back later. This morning, very early in the morning, I needed to look something up. I have a post: https://www.gerisch.org/wordpress-copy-to-test-environment/ which has what I need.
But the link to Rose Hosting did not work.
WTF WordPress?
Here’s what it looks like inside WordPress:
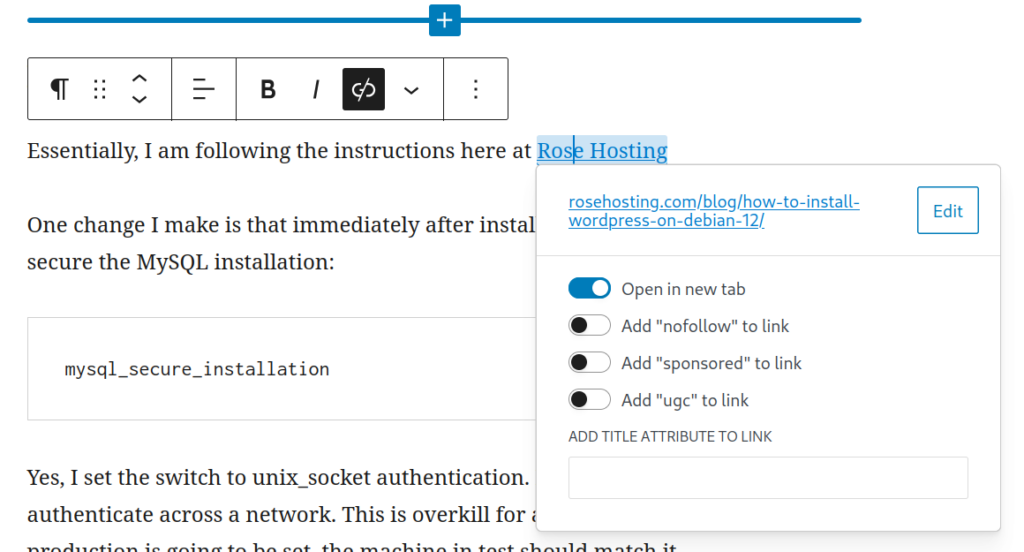
You can see that the link edit has a URL that has https://www.rosehosting.com/blog/how-to-install-wordpress-on-debian-12/
But that link doesn’t work‽
Here’s what Firefox shows when I inspect the HTML for that link:
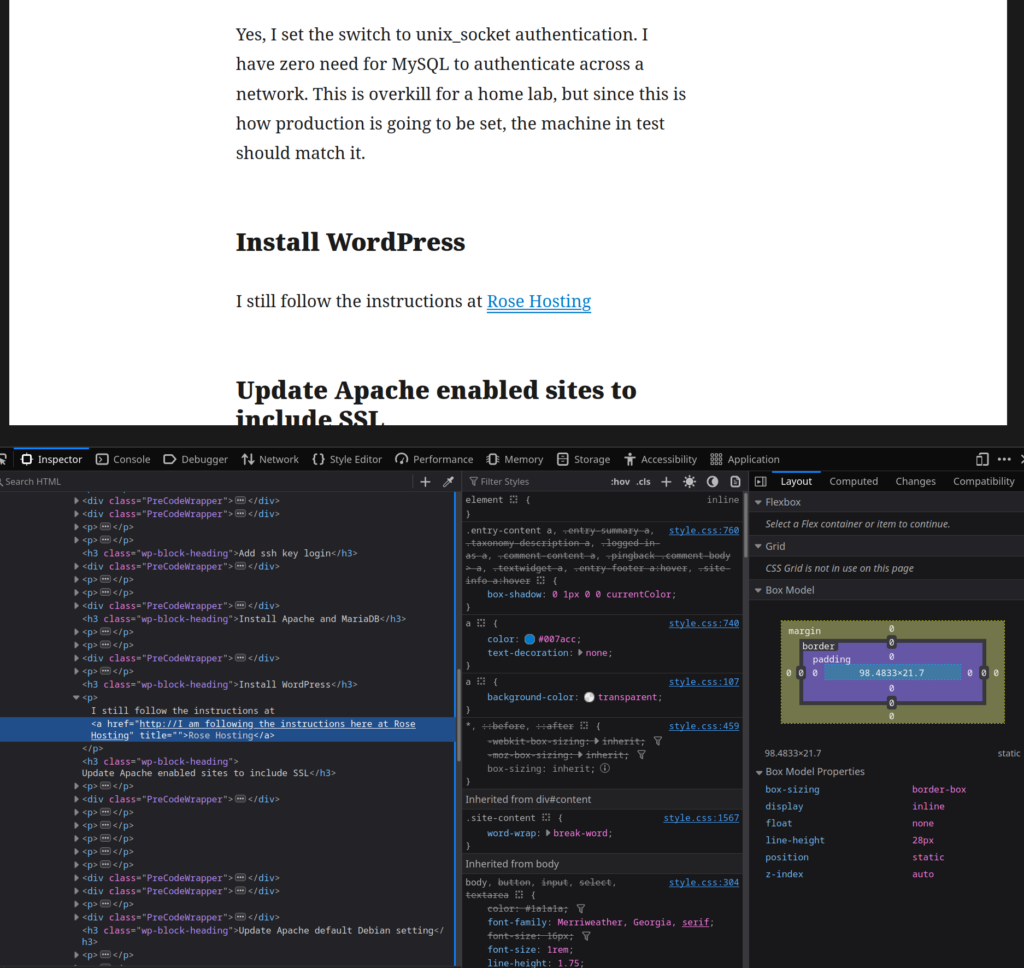
Here’s what that highlighted part (in blue, on the left) says in that screenshot: http://I am following the instructions here at Rose Hosting
WTF‽
Meanwhile, Matt Mullenweg is pissing all over the WordPress community over petty grubbing for money.
Fix your damn shit, Matt.
Proxmox copy of WordPress virtual machine – changing the siteurl
I’ve gone into Proxmox and cloned a WordPress machine to a new machine. I configured DNS and DHCP to assign a new host name for the machine; now I need to get WordPress to understand that too.
Because WordPress stores the site URL inside the database, this means running a MySQL query.
The problem is that the old WordPress site (because that is what is in the new machine’s database) keeps telling Apache to serve up the pages from the old machine. So everything on the new machine will need to resolve at https://tratest.example.com but because WordPress is going to its database to find out where everything is, as soon as the page loads, it tries to go to https://aawp.example.com
That machine is powered off in Proxmox, so obviously nothing works.
Can’t really use any tools inside WordPress to do the search-and-replace, so I need something outside of WordPress. I generally do not install phpMyAdmin, because 1) it is extra work to configure Apache to serve up a different website just for this one function, and 2) that becomes just one more place a bored 14 year old might try to break in. If I don’t need it, why put it out there?
So let’s try some MySQL queries from the command line.
UPDATE wp_options SET option_value = replace(option_value, 'https://aawp.example.com', 'https://tratest.example.com') WHERE option_name = 'home' OR option_name = 'siteurl';
Nice! I did a restart of Apache, and now the new machine at the new domain name serves up the content from the cloned machine. I know that this worked because the old machine in Proxmox is still powered off.
There are also several other changes I made:
- hostnamectl set-hostname tratest.example.com
- edited /etc/hosts and copied the 127.0.1.1 entry to 127.0.2.1 and added the new host name, per Change host name and domain
- edited the Apache .conf file in /etc/apache2/sites-available/ and replaced the ServerName entry
WordPress sucks, issue <whatevs>
Out of nowhere, every time I clicked on a Gutenberg block on a draft post (my Quarterly inventory post) I’m getting “This block has encountered an error and cannot be previewed.”
The solution is (apparently) to disable every plugin – oh hey looky there: the error went away – and re-enable them one-by-one.
Yay.
I’d so rather being doing this than making progress on how to update a WordPress site URL after cloning in Proxmox. Not.
AND OF COURSE, NOTHING WAS WRONG
Grrr. I’ve now re-enabled every plugin, and Gutenberg is fine.
Apparently, the code base on WordPress is so good that one just needs to disable every plugin and re-enable them once in a while.
WordPress copy to test environment
I’m a fan of Tenets of IT
Number 15 of which is “Everyone has a test environment, not everyone is lucky enough to have a separate production environment.”
Heh.
This post will be how I copied a production web site to a test environment.
Prerequisites are:
- A virtual machine server
- A domain name
- A wildcard certificate for that domain name
In my case, for the virtual machine server, I bought a used Lenovo Tiny PC from Amazon, loaded it up with RAM and installed Proxmox on it.
I had bought a domain name, really for my Nextcloud instance, but I can also use it for my home lab.
I have a firewall, which can get SSL certificates from the EFF project Let’s Encrypt, via the certbot / acme protocol. I went through the trouble to get a wildcard certificate, so that any box in my domain name can be SSL protected.
The basic steps
- Prepare the new machine
- Install WordPress
- Export WordPress “production” and import to “test”
- .
- .
- .
- Profit!
Prepare new machine
- Install Debian
- Add vim and other configurations
- Change host name and domain
- Add ssh key login
- Install Apache and MariaDB
- Install WordPress
- Update Apache enabled sites to include SSL
- Update Apache default Debian setting
- Install one WordPress plugin to import the export
- A note about ASE (Admin Site Enhancements)
Install Debian
This was a Proxmox step, and I think I did it from a .ISO file
Add vim and other configurations
apt-get install vim
In my most recent build, vim was preinstalled
update-alternatives --config editor
option 2 was what set vim to my system default
vim ~/.bashrc
Find the aliases I want and add them, uncomment them, etc. I always add:
alias ..='cd ..'
PS1="\[\033[0;32m\]\u\[\033[0;37m\]@\[\033[0;35m\]\h \[\033[0;34m\]\W\[\033[0;31m\]\$\[\033[0m\] "
vim /etc/inputrc
Find # "\e[5~": history-search-backward and uncomment it
Change host name and domain
I should mention that in my home firewall, it is also my local DNS resolver. So inside there, I have server1.example.com mapped to the IP address Proxmox gave to my new virtual machine (Proxmox got it from my DHCP server).
hostnamectl set-hostname server1.example.com
vim /etc/hosts
In here, I added an entry for 127.0.1.1 which maps the fully qualified host and domain name to the host. So for example, 127.0.1.1 server1.example.com server1
The address 127.0.1.1 is specified because Apache will try to identify the site by name (later). Everything in the 127.x.x.x maps to the local machine, so they all go to the same place. But having it as 127.0.1.1 stops a duplication conflict with 127.0.0.1 for localhost
Add ssh key login
ssh-copy-id root@server1.example.com
Never, in production, would I be commonly logging in as root. But this is a test / play environment, and I find the process cumbersome to set up an alternative user, and then have to be constantly doing a su - (switch user) to root. Since this is in my home lab and not visible on the public Internet, this is not so much a risk. And … before I really try anything screwy, I can take a Proxmox snapshot.
Another thing I run into, is that because I can rip and replace virtual machines easily, I tend to have to delete old entries from the ./ssh/known_hosts file.
ssh-keygen -R "server1"
Install Apache and MariaDB
Essentially, I am following the instructions here at Rose Hosting
One change I make is that immediately after installing MySQL, I run the process to secure the MySQL installation:
mysql_secure_installation
Yes, I set the switch to unix_socket authentication. I have zero need for MySQL to authenticate across a network. This is overkill for a home lab, but since this is how production is going to be set, the machine in test should match it.
Install WordPress
I still follow the instructions at Rose Hosting
Update Apache enabled sites to include SSL
The Rose Hosting instructions don’t disable the 000-default.conf web site
a2dissite 000-default.conf
Now, how to make https:// work? Well, there is already a default-ssl.conf file, so all it really needs is a certificate and key, and for Apache to use SSL. The SSL certificate files mentioned there are /etc/ssl/certs/ssl-cert-snakeoil.pem and /etc/ssl/private/ssl-cert-snakeoil.key
I have exported my wild card certificate and key to my local machine, so now I upload them to those directories, and change the names in the default-ssl.conf file.
Update the ServerName setting in default-ssl.conf to server1.example.com
Update the DocumentRoot setting in default-ssl.conf to /var/www/html/wordpress
Add rewrite rules to the non-SSL site to redirect to the SSL site. In wordpress.conf add:
RewriteEngine On
RewriteCond %{REQUEST_URI} !.well-known/acme-challenge
RewriteRule ^(.*)$ https://%{SERVER_NAME}$1 [R=301,L]
RewriteRule ^ https://%{SERVER_NAME}%{REQUEST_URI} [END,NE,R=permanent]
apachectl -t
If this checks out well, that’s nice, but there is still one more thing to add:
a2enmod ssl
Update Apache default Debian setting
This one threw me for a loop – all my redirects were going to 404 error pages.
It turns out that the default setting on Debian has an Apache configuration file with rewrites not allowed.
vim /etc/apache2/apache2.conf
Find my way to the <Directory /var/www/> section. Change the AllowOveride setting from None to All.
The /var/www directory is of course higher up in the directory structure of what Apache is going to serve up. Because it is higher, the AllowOveride None directive overrides the lower level allow all. Whoops – for WordPress this is no bueno.
Finally, restart (not reload) Apache:
systemctl restart apache2
Install one WordPress plugin to import the export
For this, I am following the instructions by Ferdy Korpershoek on this YouTube video
(The YouTube front page has become politicized trash, but for technical videos, it still has good stuff one can find).
Essentially, I install the All-in-One WP Migration plugin on the production web site, do an export, and then install a fixed version of the All-in-One WP Migration plugin on the test web site.
Ferdy does clean up the new / fresh web site first, by deleting and emptying the default pages and posts. I also deleted the default plugins.
After the import is done, I need to log in again, because the database was replaced, which is where my login credentials are stored. After getting logged in, I need to save Permalinks twice.
A note about ASE (Admin and Site Enhancements)
I was almost at hooray! But, I have a small security enhancement via Admin and Site Enhancements (ASE) which threw a tiny wrench in the monkeyworks. Yes, in production, I’ve hidden the login URL to somewhere other than normal. So after the import, All-in-One WP Migration (100 GB version) provides a link to update the Permalinks, but because of ASE, that URL was not found. No biggie, I simply had to use the URL that was appropriate for the production web site.
Profit!
And now I get to bask in the glory of messing the heck out of the test (not production!) WordPress web site. Fun times. 🙂
I think I’ll take a Proxmox snapshot first.
Updating to WordPress 6.6 was a mistake
Automattic (I presume) added a JavaScript framework to WordPress 6.6, which increased the amount of RAM the server uses. On a small machine, the RAM increase is massive: almost doubling the amount of RAM used.
Nicely, the downgrade of WordPress to version 6.5.5 was easy enough; but, this now leaves a huge question mark for the future. At some point, either my server goes out of date and becomes vulnerable to new-found security flaws, or, I have to start shelling out an additional $84 per year for their new fanciness.
It would be nice if they put a radio button in the administration page to enable or disable the new React JSX stuff.
WordPress Gutenberg is getting worse
A lot of this blog are my entries to help myself with some task. I like to copy / paste commands that I don’t want to memorize. If those commands help someone else trying to do the same task, that’s wonderful.
Copy / past has been a bit of a chore on WordPress, however. I’ve tried three different plugins. The first one worked for a while, but then broke. It was based on WordPress shortcodes. I don’t recall if it was WordPress that upgraded and broke the plugin, or if it was the plugin that upgraded and broke. Whatever: the shortcode stopped working.
The second plugin worked at least once, but then broke after an update of some sort. It was supposed to work either by specifying a shortcode or text formatting. I’m pretty sure the text formatting was supposed to be for “inline code”. When the plugin saw that the text was marked up that way, it added the copy-to-clipboard function. It was pretty frustrating to go back and edit some old posts and less than a month later, those posts are trashed up without providing copy-to-clipboard access.
This third plugin, Copy Code To Clipboard works well, and it is based on the /preformatted text attribute.
I don’t recall if this is the way it always was, but: it appears that this only works with whole blocks now. You can have inline code or keyboard input within a paragraph, but you cannot have /preformatted within your paragraph.
But, the /preformatted block type is just implementing the HTML tags <pre> and </pre>
So, I can edit in HTML mode and insert it that way, right?
Where WordPress has made things worse, is that now, <pre> and </pre> implement a forced <br></br> immediately before <pre> and immediately following </pre>
And it doesn’t put those codes in the HTML. It just sneaks them in there and taunts me with the extra lines before and after every piece of text I want copy-to-clipboard for.
Thanks, WordPress developers: I hate it. You’ve made the world a worse place.
And another thing ….
This showed up many months ago, shortly after Gutenberg became official: Ctrl-K for creating an anchor (link) used to be great. On another web site I maintain, we have an old kludgy events calendar plugin, and it still works great there. That events calendar plugin does not use Gutenberg.
All I want for Ctrl-K is to highlight the text to form a link, hit Ctrl-K to start the anchor creation, hit Ctrl-V to paste in the URL, and hit <Enter> to finish the anchor.
Guess what no longer works in Gutenberg? Hitting <Enter> to finish the anchor.
I am always so very overjoyed when I have to finish an operation by grabbing my mouse and finding the stupid little button to click to indicate that I want to finish creating the anchor. I’m editing an anchor: there’s really not that much more that I can do here.
Like what the heck was the <Enter> key supposed to otherwise signal?
In the current Gutenberg, it is simply a no-op. Useless. A waste of a keystroke. Until I find the stupid mouse cursor and click on the stupid little submit button, the anchor is incomplete. All editing has come to a stop, until I do some freaking mouse work.
Thanks, WordPress developers: I hate it. You’ve made the world a worse place, again.